Tools
Secondary menu

The right-click menu, or secondary menu, combines the most important project-related operations into one compact menu.
Color wall
Right-click on a wall, floor or ceiling and select the ![]() icon. The “Colorize Wall” dialog opens, where you can colorize the selected element.
icon. The “Colorize Wall” dialog opens, where you can colorize the selected element.
Wall dimensioning
This tool works only on walls and temporary architecture. First place at least one exhibit on a wall and then right-click on that wall. Now select the ![]() icon to display the dimensions.
icon to display the dimensions.
Wall development as PDF
To get a PDF document with all dimensions, right-click on the desired wall and select the ![]() icon.
icon.
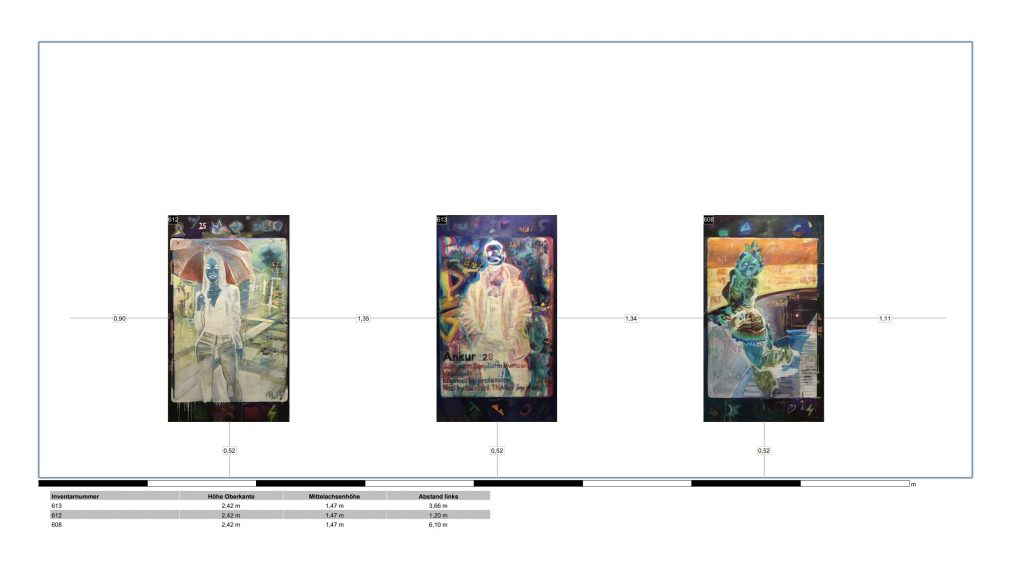
Note:
At least one exhibit should be placed on the wall to create a sensible wall layout.
Create screenshot
A screenshot in double window resolution of the respective working perspective can also be created via the right-click menu. First align your view in the 3D, or model view and then right click on the floor, wall or ceiling and select the ![]() icon. After that, your file manager will open and you can determine where to save your recording.
icon. After that, your file manager will open and you can determine where to save your recording.
Create InteractiveTour VR
Under this menu item ![]() you can create virtual tours of your exhibitions. For this you need the InteractiveTour VR plugin, more about this in the corresponding section.
you can create virtual tours of your exhibitions. For this you need the InteractiveTour VR plugin, more about this in the corresponding section.
Automatically place exhibits
Select the ![]() icon from the right-click menu and automatically pre-place exhibits on a wall. Before placing, you have the option to set the minimum distance between the individual exhibits. This function is particularly effective when used in conjunction with filtering. Search your exhibits for e.g. an artist and place the respective exhibits on the desired wall.
icon from the right-click menu and automatically pre-place exhibits on a wall. Before placing, you have the option to set the minimum distance between the individual exhibits. This function is particularly effective when used in conjunction with filtering. Search your exhibits for e.g. an artist and place the respective exhibits on the desired wall.
Tools
Wallpaper / Background graphics
Import an image file or use an exhibit that has already been imported.
Search for the corresponding image in the “Gallery bar” and double-click on the image with the left mouse button to change the dimensions of the image. Enter the appropriate height and width under the “Exhibit” tab and confirm the settings with the “Apply” button at the bottom right of the window. After you have adjusted the settings, you can drag the picture from the “gallery bar” onto the desired wall.
Now carry out the positioning and finally click on the “Create wallpaper” button in the “Quick positioning tool”.
To change a wallpaper back, click with the right mouse button on the corresponding wall and select the wall colouring symbol ![]() in the “Secondary menu”. After the wall colouring window has opened, all you have to do is click on the “Remove wallpaper” button, whereby the wallpaper is converted back into a normal image and placed back in the “Gallery bar”.
in the “Secondary menu”. After the wall colouring window has opened, all you have to do is click on the “Remove wallpaper” button, whereby the wallpaper is converted back into a normal image and placed back in the “Gallery bar”.
Tools
Create text
Our software allows you to create texts using an internal text editor. Once placed in the exhibition rooms, the texts can be edited at any time by double-clicking on the text.
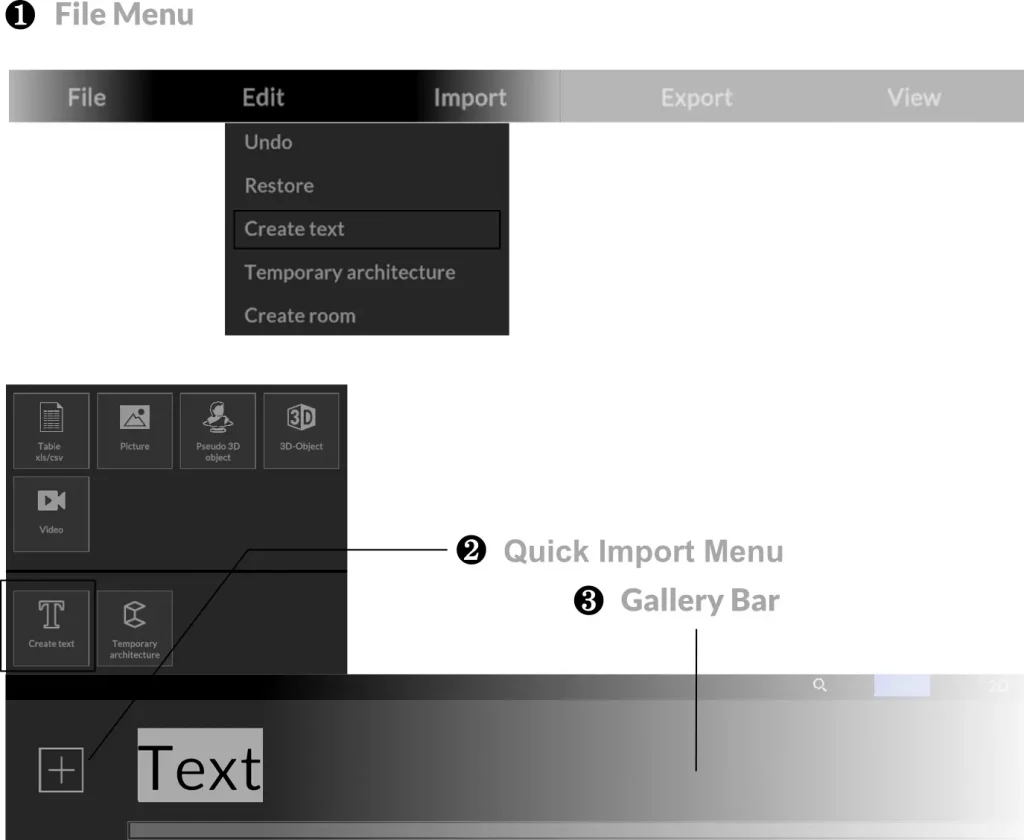
You can find the text editor in the “File menu” ❶ or in the “Quick import menu” ❷ at the bottom left of the “Gallery bar” ❸.
Just like exhibits, the created text elements are initially located in the “Gallery bar” ❸ and must first be dragged and dropped onto the walls. Once the created text element has been placed on the wall from the gallery bar, you can start editing by double-clicking on the text.
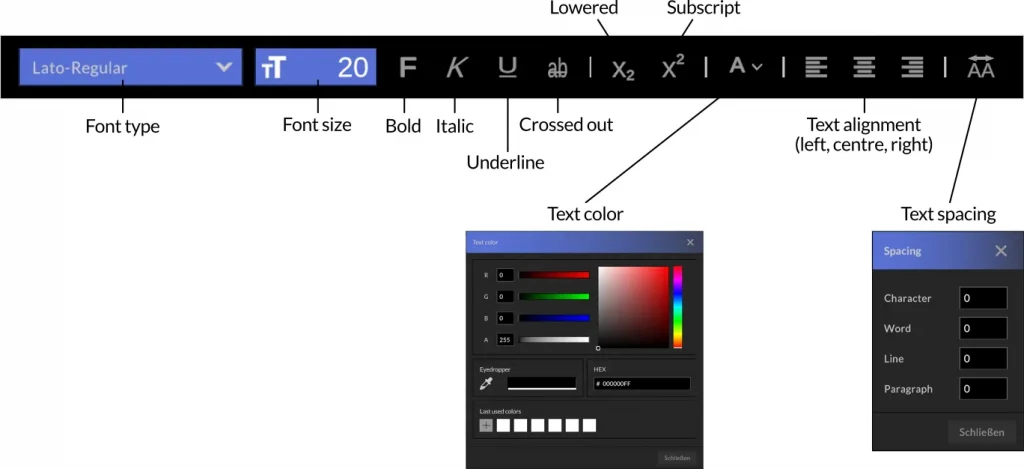
Move texts while holding down the mouse button and adjust the text box format with the blue frame. The editing of the text corresponds to that of standard word processing programs, select individual letters or entire words to adjust font styles.
For typographically complex texts, please use common editors such as Adobe Indesign® or Affnity Publisher®.and export it in PNG format with layer transparency. The imported texts behave like images that can be scaled.
This function is ideal for incorporating texts already set by Gestaler:Innen into the visualization.
Tools
Temporary architecture
With the temporary architecture, you can create pedestals, platforms, pillars and free-standing walls that you can later hang exhibits on, add texts to and colour. To create temporary architecture, use the “File Menu” or the “Quick Import Menu” again and select the appropriate menu item.
In the opened editor you will see the floor plan of the building, now navigate to the desired room with the third mouse button pressed (scroll wheel) and double-click at the desired location where, for example, a base is to be created. Then edit the dimensions of your temporary architecture.
Hold down the left mouse button to reposition the pedestal in space, use the distance grid to move the object only at certain distances.
To delete temporary architecture, right-click on the corresponding architecture element. Note that there must no longer be any exhibits on the wall / plinth to be deleted.