museum pro
Download
First steps
License validation
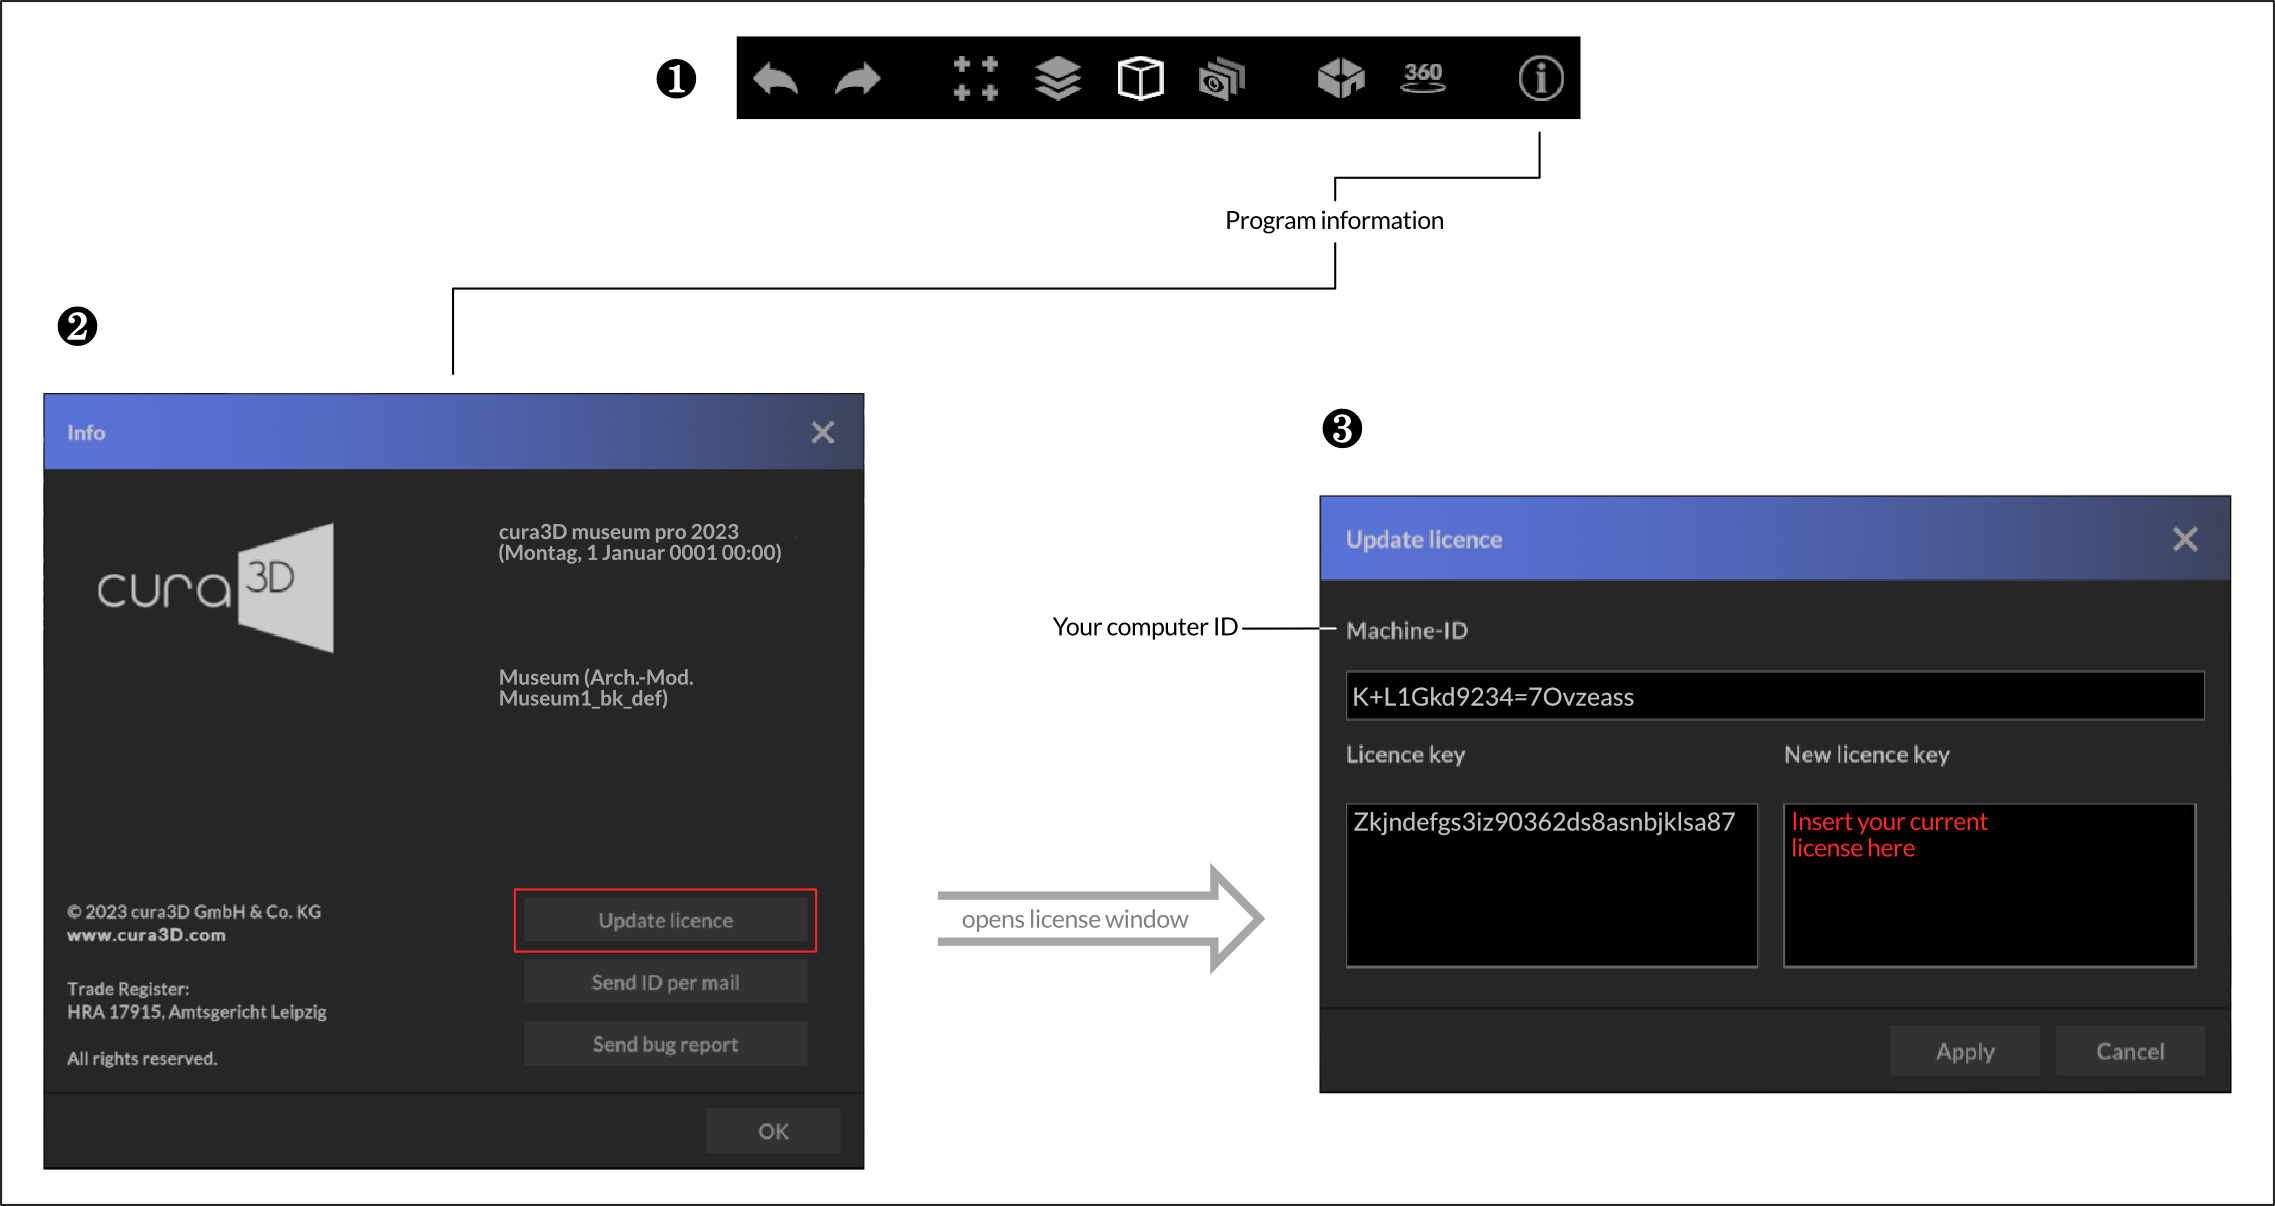
When you start museum pro for the first time, the “Program Info” window ❷ will open automatically and you will be prompted to enter your license key ❸ to unlock the software.
For this process, you absolutely need an Internet connection. If you are behind a so-called “proxy” with your computer, you can make these settings for the verification process yourself.
To do this, it is best to contact your responsible administrator or IT representative. Under Settings -> Connection settings you can adjust the proxy information.
Your “ID” is bound to your computer. If you have chosen a single user license (e.g. fairplanner pro), the license key is linked to this ID and can only be used with this computer.
The ID is irrelevant for the use of float licenses.
If you need a new licence key for your activated computer, you will find the hardware ID required for this in the “Program info” window. This window can always be found on the “i” symbol of the “Toolbar”, see Figure❶. You can also send us the ID here conveniently via ID by email.
First steps
Settings
Basic settings
Here you can make basic settings:
- Language selection (English, French, German, Suomi, Swedish)
- Setting the dimensional system (metric / imperial)
- Global centerline height
- Display quality
- Base light adjustment (requires PlugIn Lighting)
- Viewing angle – Field of View (FOV)
Connection data
If you have purchased the PlugIn to connect to your museum database, you will need to store your access data in the Database Connection section to enable the import of exhibits and collections.
Please feel free to contact our support team for the initial setup.
If you have purchased our plugin InteractiveTour VR, you have received connection data from us, which are to be entered in the appropriate fields to be able to publish virtual tours on the Internet.
The access data should already be filled in with the software installation. If you use a proxy server in your network infrastructure, then ask your local administrator for the connection details. Then check the “Use proxy” box to connect to the proxy server.
First steps
User interface
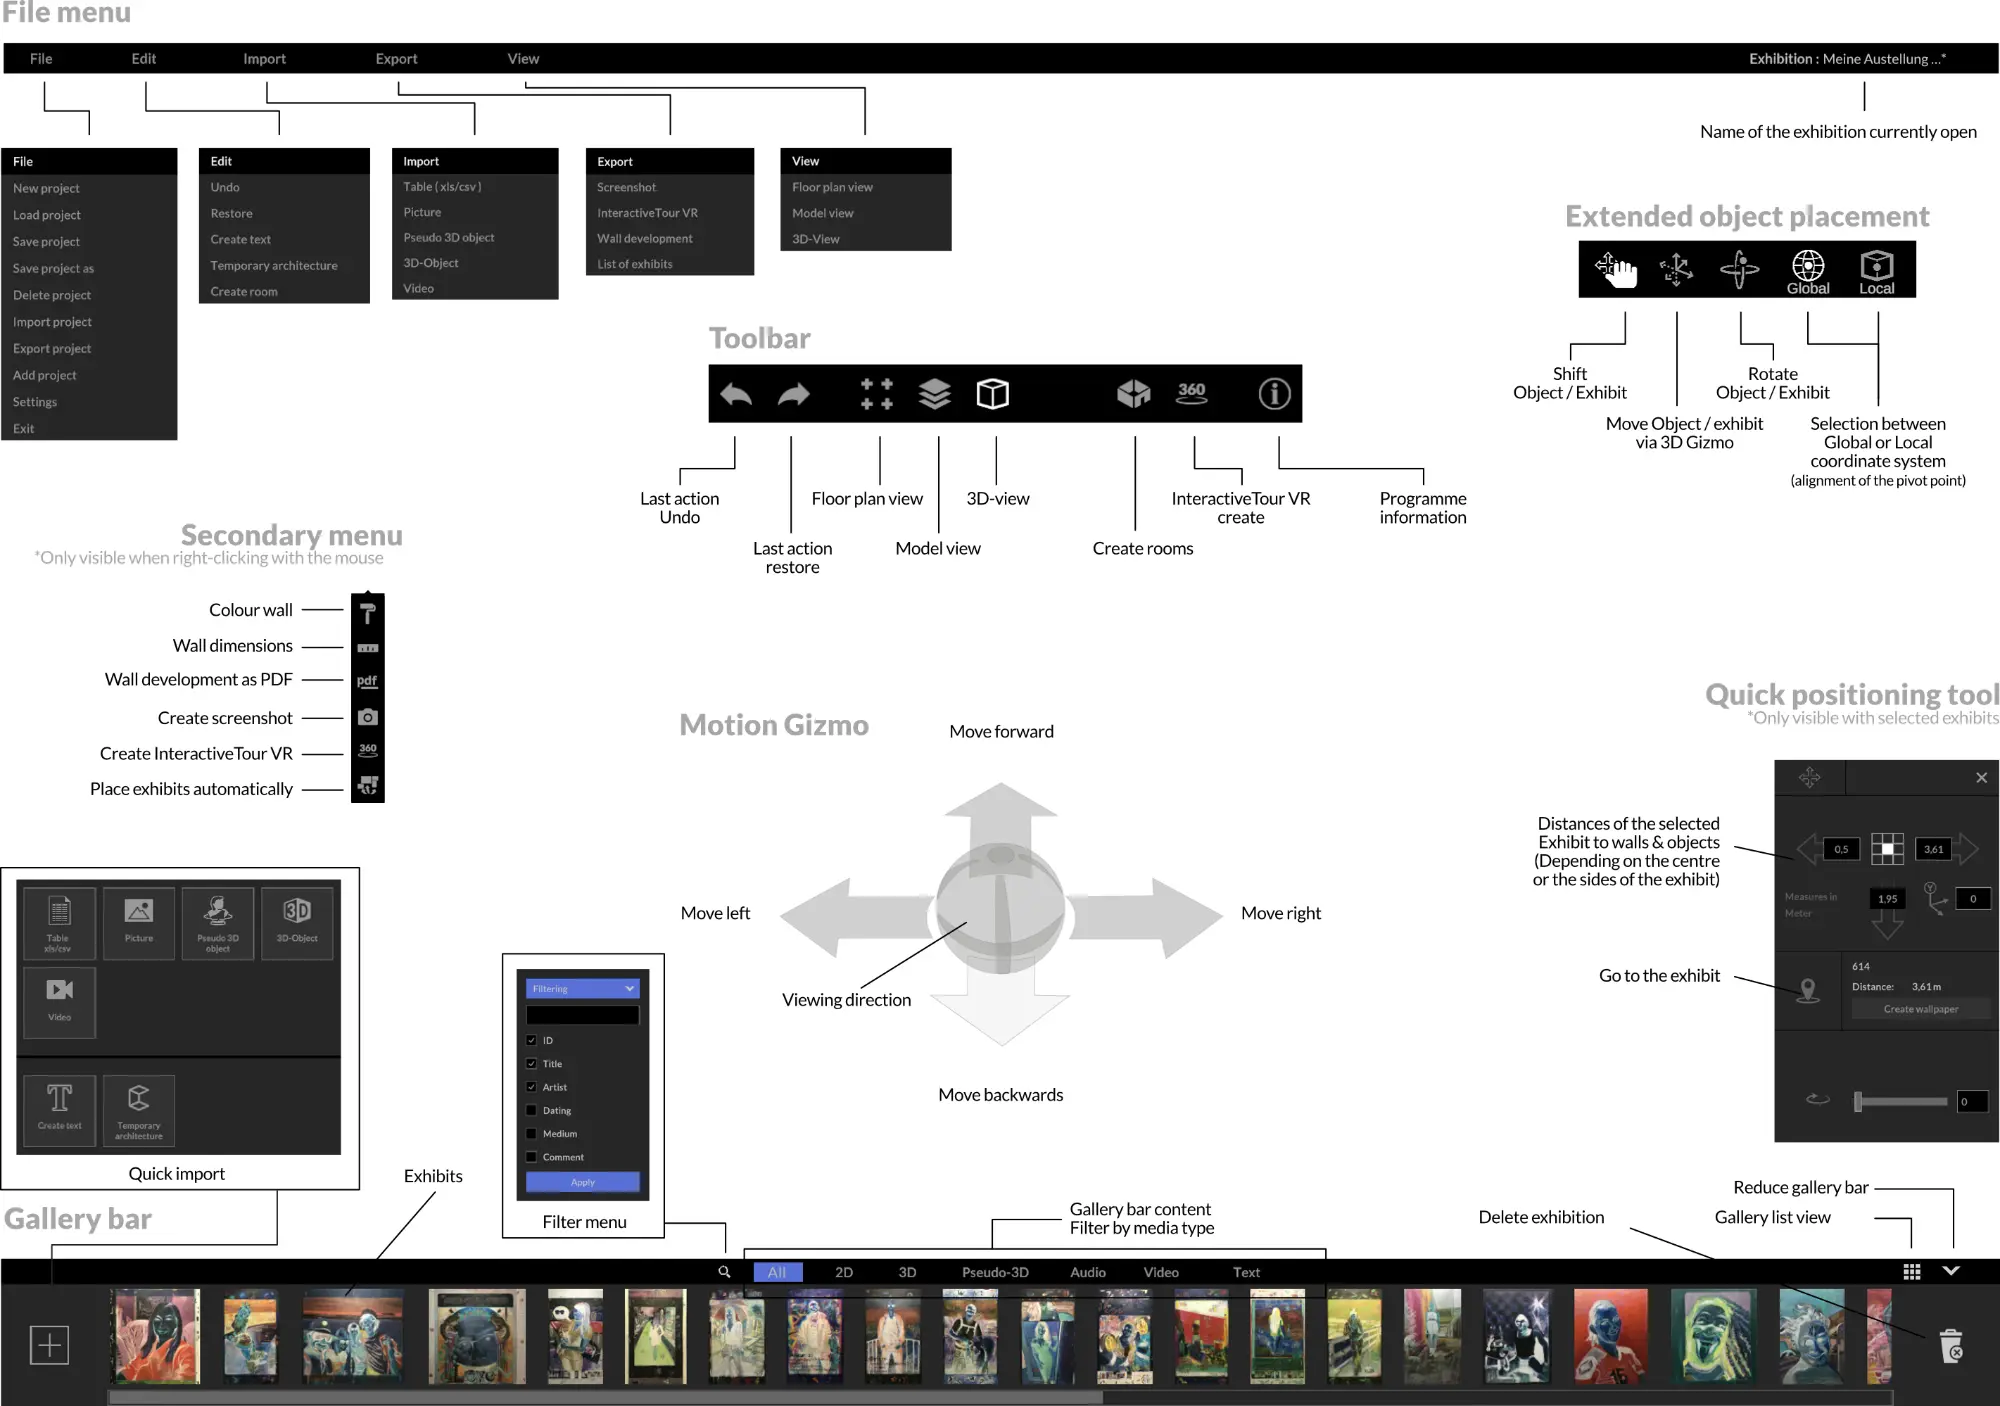
The user interface has been designed so that you can quickly and intuitively find your way around. The interface is divided into three main areas.
The header area contains the text-based “File menu” and the “Toolbar” with the most common program actions.
The middle area is used for planning interaction and is your workspace.
You will find the “Gallery bar” in the lower application area. In this area, the imported exhibits are displayed and selected for placement. Various filter and search options help you to find the desired exhibit in the shortest possible time, even for extensive exhibition projects.
Navigation
Motion control
Movement Gizmo
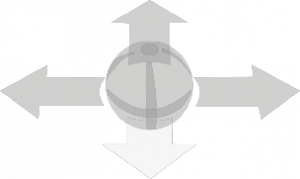
Click on the direction arrows with the left mouse button to move forwards, backwards or sideways, for example. If you keep the mouse button pressed, you move continuously in the selected direction.
To change the viewing angle in space, click the “trackball” with the left mouse button. Hold down the mouse button and move the mouse in the desired direction of view.
Alternatively, you can change the viewing direction by holding down the mouse wheel and moving the mouse.
Movement via keyboard
You can also move around the room using the keyboard. Use the “WASD” keys to do this.
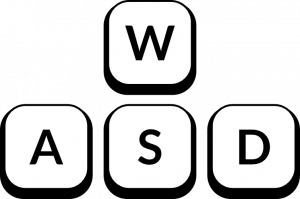
To move around the room faster, you can also hold down the Shift key.

Note:
Pressing the space bar always aligns your gaze with the horizon axis.
Movement via mouse only
Alternatively, you can move around the virtual space using only the mouse.
To move forward, scroll forward with the mouse wheel. If you turn the mouse wheel backwards, you move backwards.
Note:
If you double-click on the floor with the left mouse button, you will automatically move to this position.
Navigation
Editing views
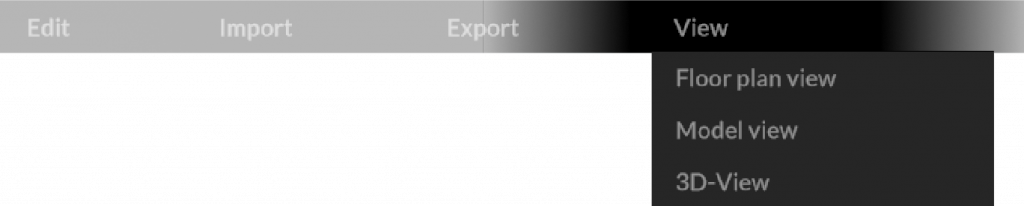
The exhibition rooms can be viewed in different views.
The different views help you place exhibits and position yourself in the room as easily as possible. You can switch views using the “View Menu” or the “Toolbar”.

Note:
When you open the application, you always start in the 3D view.
Floor plan view
The floor plan view is great when you want to place 3D exhibits in the room or quickly move to another room. If you want to change the floor, click on the corresponding architecture overview icon at the bottom left.
Modellansicht

In the model view, you can check the positioning and effect of the exhibits from different perspectives and perform a quick pre-placement of the exhibits across multiple rooms.
By keeping the scroll wheel pressed and moving the mouse at the same time, the model can be rotated. Also in this view you can show and hide the floors with the architecture overview icon.
3D view
The 3D view is the default view and is used for interaction in the room and with the exhibits. Work images can be placed on the walls or on the floor via drag & drop. This view helps you evaluate the works in the virtual exhibition space and make hanging and placement optimizations.
Note:
In all three views, the exhibits can be placed and moved using drag & drop. Double-click on the floor of the showrooms to return to the 3D view and automatically move to the highlighted location.
Exhibits
Import and sift
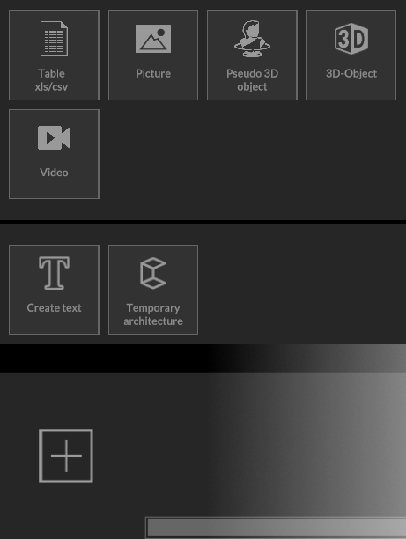
You can import all exhibits and exhibit lists using the “Import Menu” at the top of the screen or the “Quick Import Menu” at the bottom left of the screen in the “Gallery Bar”.
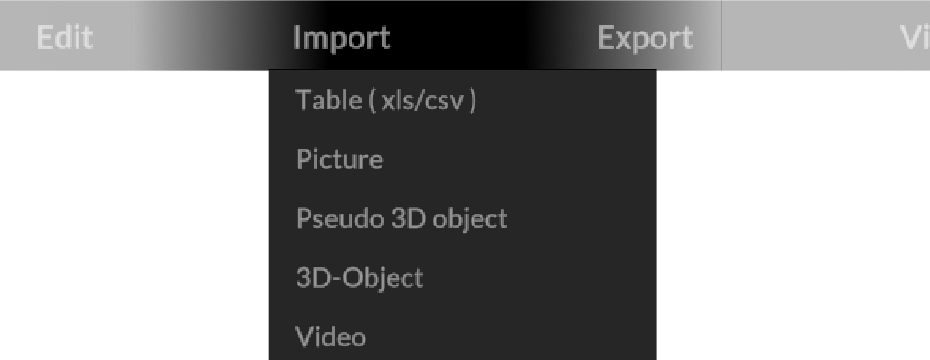
In both menus you will find the possibility to import the following media format and lists:
- 2D images (BMP, JPG, PDF, TIFF, PNG)
- 3D objects (FBX, DAE, OBJ, GLTF)
- Pseudo 3D object (PNG, JPG)
- Video (MP4, OGV)
- Exhibit lists in XLS(X), CSV format
Imported exhibits are initially displayed in the “Gallery Bar” until they have been appropriately placed in the room (wall / floor).
Exhibits
Partial deletion
Partial deletion is a convenient solution that allows you to use a simple menu to select what you want to move back to the gallery bar or what you want to permanently remove from the project.
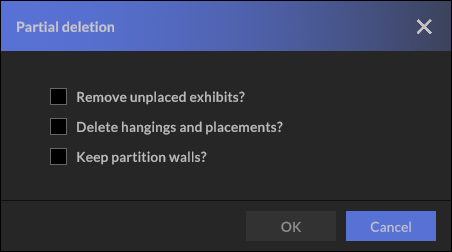
If you only want to remove the unplaced exhibits within the gallery bar, select the corresponding menu item “Remove unplaced exhibits?” as shown in the illustration. All imported exhibits are removed from the gallery bar, regardless of the file type. All exhibits placed within your project remain untouched.
If, on the other hand, you would like to move all placed exhibits on walls and floors etc. back to the gallery bar, select the menu item“Delete hangings and placements?”.
Have you painted walls or used temporary architecture and no longer need it? Select “Keep temporary architecture?” and all wall colors will be set back to white and temporary architecture will be removed.
Note:
If you do not check any of the three boxes and confirm the partial deletion with “OK”, the entire exhibition will be deleted and you will start again with an empty project.
Exhibits
List import (XLS / CSV)
cura3D museum pro offers the possibility to import exhibit data in XLS, XLSX or CSV file format.
In the attached screenshot you can see the structure of the sample file used for the import. It is mandatory to specify the image (file) name associated with the exhibit entry. In addition, all associated image files must be located in one folder, which you must select using “Select image path”. Again, you can use both the text-based “File Menu” at the top of the screen and the “Quick Import Menu” at the bottom left of the “Gallery Bar”. If the file has been imported successfully, you only need to assign the correct attributes to the corresponding table column (see figure).
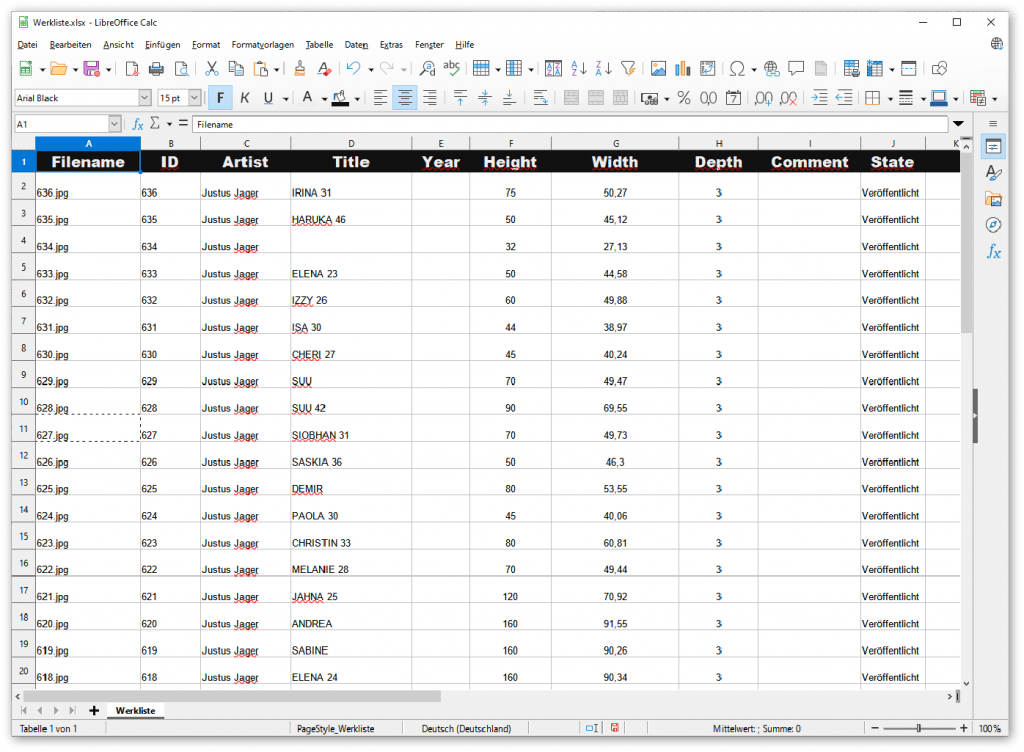
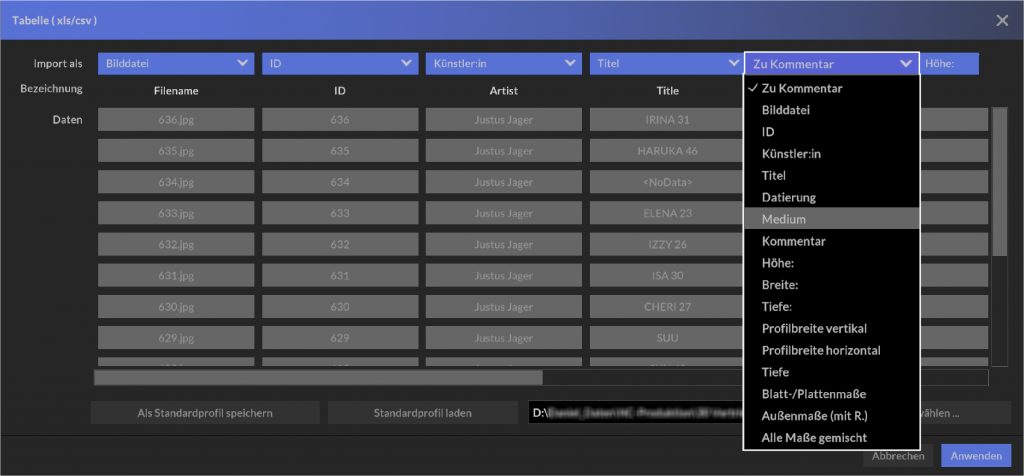
Note:
If your different tables have the same structure, you do not need to reassign the metadata entries each time. To do this, simply select “Save as default profile”. When importing again, you then only need to adjust the image path accordingly.
Exhibits
Placing and positioning
To place an exhibit on a wall, or on the floor, go to the 3D or Model view and drag the exhibit from the gallery bar to the desired location while holding down the left mouse button. Left-click and hold the mouse button to move the exhibit to the desired position.
Note:
If an exhibit cannot be placed in the desired position, please check the dimensions of the exhibit. Simply double-click with the left mouse button on the corresponding work in the gallery bar to call up the detailed view. Under the “Exhibit” tab you can change the dimensions if necessary.
This is especially necessary for different 3D objects, since different coordinate systems and units of measurement can lead to errors, depending on the software used to create them.
Exhibits
Quick positioning tool
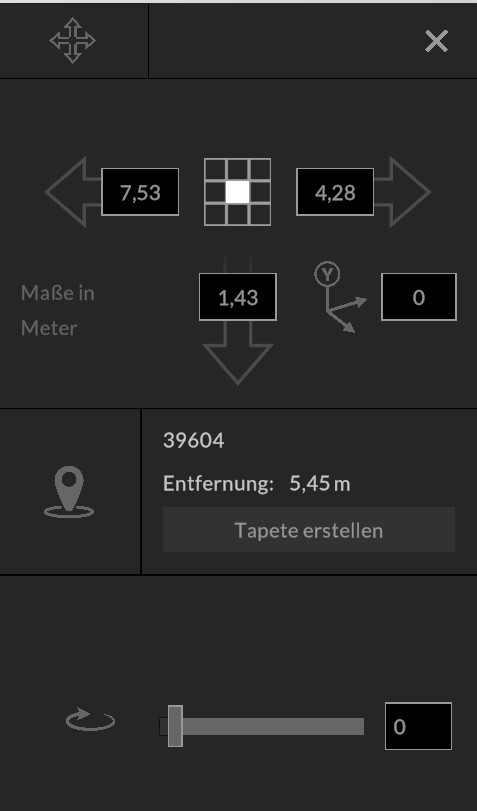
Left-click on an exhibit to open the quick positioning tool. With this tool you can precisely position exhibits and get advanced adjustment options.
The dimensions in the input fields indicate the distance of the exhibit from the outer edges of the wall, or the floor / baseboard. Change the values here to influence the positioning. In the center you will find a “grid field” that contains a total of 10 measurement points. Using these, an exhibit can be aligned very easily, taking into account the top, middle or bottom edge height.
By clicking on the location icon ![]() you move frontally to the selected exhibit, next to it the current distance to the exhibit is displayed. If you want to use imported image files as background graphics (“wallpaper” to click the “Create Wallpaper” button.
you move frontally to the selected exhibit, next to it the current distance to the exhibit is displayed. If you want to use imported image files as background graphics (“wallpaper” to click the “Create Wallpaper” button.
Attention: You cannot select this created graphic with a left click afterwards. To further edit or remove the wallpaper, switch to the dialogue Colour wall (see secondary menu)
Selected 2D exhibits can be rotated around one axis, (pseudo) 3D objects can be rotated on two axes. To rotate the selected exhibit, move the corresponding slider to the right or enter a numerical value (specified in degrees) in the adjacent text field.
Exhibits
3D exhibits
museum pro can import a variety of common 3D file formats. To import 3D data, you can also use the “File menu” or the “Quick import menu”.
After selecting the file in the file manager, the 3D models are loaded into the “gallery bar”. A double click on the respective 3D object in the gallery bar opens the exhibit view. Here you can edit metadata, check or change dimensions.
Note:
If an exhibit cannot be placed in the desired position, please check the dimensions of the exhibit. Simply double-click with the left mouse button on the corresponding work in the gallery bar to call up the detailed view. Under the “Exhibit” tab you can change the dimensions if necessary.
This is especially necessary for different 3D objects, since different coordinate systems and units of measurement can lead to errors, depending on the software used to create them.
Exhibits
Showcases
Configurable and playable showcases are 3D objects created by cura3D especially for museum pro. Exhibits can be placed on the predefined trays.
Note:
If a 3D object cannot be placed in the display case, please check the dimensions of the object.
Exhibits
Extended object placement
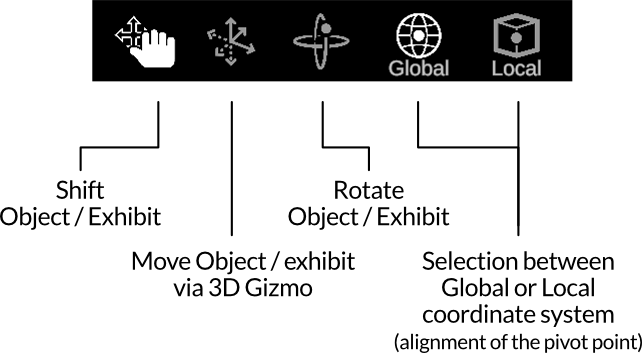
Move object

When placing 2D or 3D exhibits, the tool for moving objects is selected by default ![]() . In this mode, you can easily move objects around the room using drag-and-drop, which automatically snap into place on walls, floors and ceilings.
. In this mode, you can easily move objects around the room using drag-and-drop, which automatically snap into place on walls, floors and ceilings.
Move object via 3D gizmo
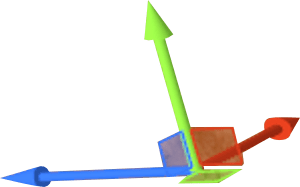
For more precise positioning of objects in space, we recommend using ![]() 3D-Gizmo, which allows you to move your selected object continuously in all axes. To do this, click and drag on one of the colored arrows displayed in the center of your object and move the object in the corresponding axis.
3D-Gizmo, which allows you to move your selected object continuously in all axes. To do this, click and drag on one of the colored arrows displayed in the center of your object and move the object in the corresponding axis.
This mode also allows you to move objects through glass surfaces and walls and to place objects floating in the room.
Rotate object

With the ![]() rotation tool, you can quickly and easily rotate the object in the corresponding axis by clicking and dragging the colored rings.
rotation tool, you can quickly and easily rotate the object in the corresponding axis by clicking and dragging the colored rings.
This tool works closely with the quick positioning tool. Settings that you make here are also displayed using numerical values in the quick positioning tool.
Global or local coordinate system
Global
Local
Sometimes it makes sense to switch from ![]() global to
global to ![]() local coordinate system, especially for objects hanging on the wall.
local coordinate system, especially for objects hanging on the wall.
These two buttons are used to realign the pivot point of your 3D or 2D object.
Exhibits
Exhibit Manager
Metadata
Under the tab “Exhibit” you will find all relevant data on the selected work. This metadata is optionally matched and imported from an existing database or from a table in csv or xls format.
You can edit the fields or add additional information at any time.
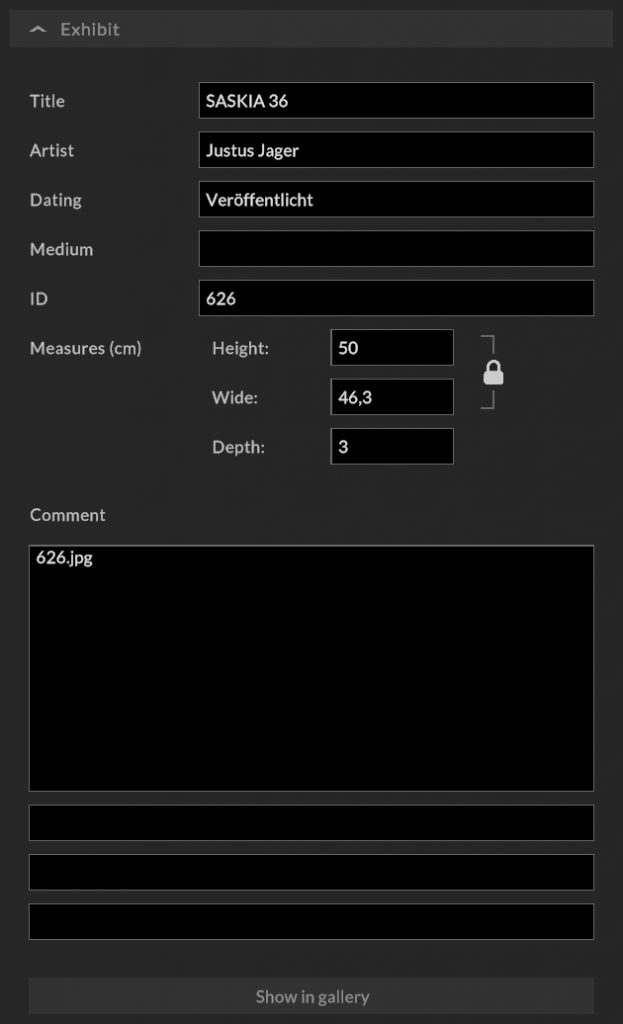
Note:
If an exhibit (2D / 3D) is too large, it cannot be placed appropriately. In this case, a manual adjustment of the dimensions must be made.
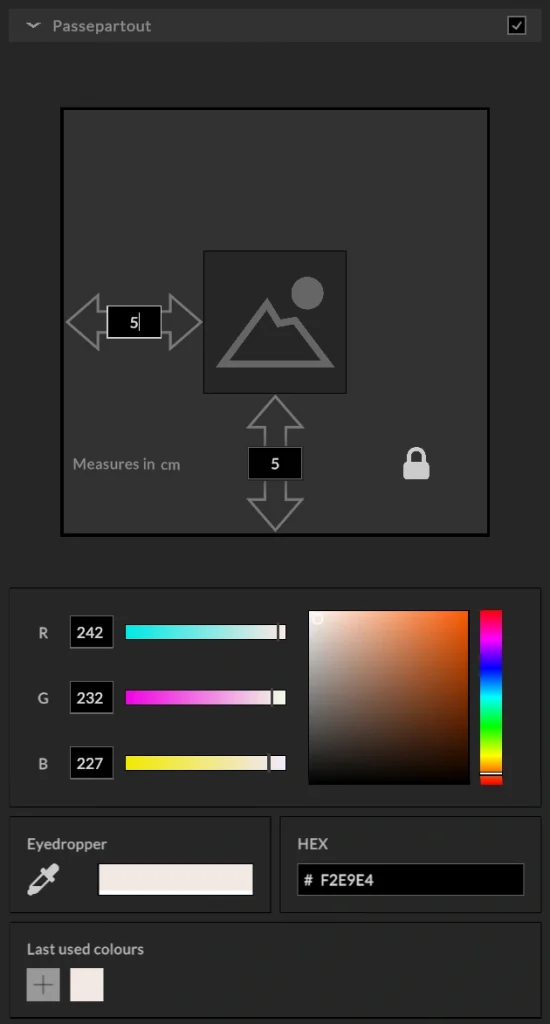
Passepartout
Activate the “Passepartout” check box with a tick and enter the desired dimensions. Via the lock symbol ( activated by default) you link the horizontal and vertical dimension input. If you want to enter different measurement values, deactivate the lock.
Then select the desired color in the color dialog. To do this, use the RGB color settings or take a color from a screen element using the pipette, or enter the hex color value. Under “Last used colors” you can save up to 8 colors by clicking the “+” button and use them in all color dialogs.
Frames
Activate the “Frame” check box. Enter the profile width of the frame and note that the lock icon for the horizontal and vertical profile width is enabled by default (In the rare case of different dimensions for the horizontal and vertical profile width, disable it by clicking).
Use the first frame type to use your own colors, otherwise a selection of different frame types is available.
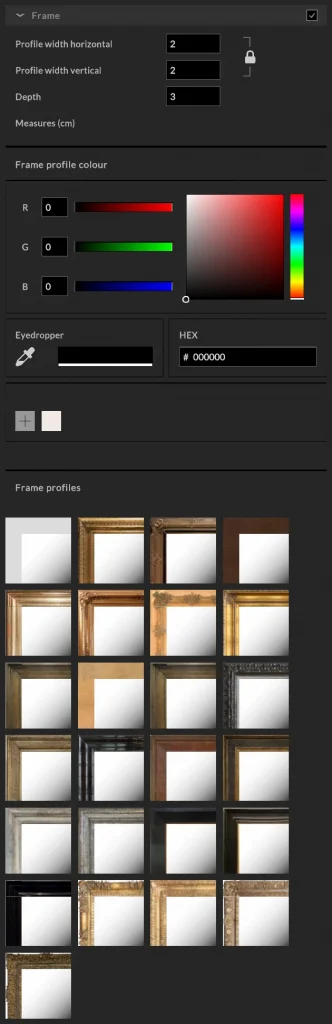
Note:
Selecting a frame from the library may overwrite your color settings, but the profile width remains unaffected.
Exhibits
Sift and sort
List view
The list view provides a quick overview of placed and unplaced exhibits. You can access the listing via the ![]() “Exhibits List” button and additionally sort all exhibits by title, artist:in, ID, wall and room name. Clicking on the work image opens the exhibit manager.
“Exhibits List” button and additionally sort all exhibits by title, artist:in, ID, wall and room name. Clicking on the work image opens the exhibit manager.
Filter exhibits
To specifically search / filter the matching exhibits in the “Gallery Bar” after import, use the ![]() “Filter Menu”.
“Filter Menu”.
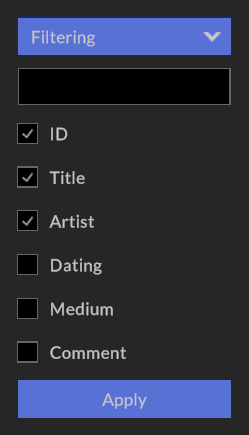
By clicking on the filter icon in the “Gallery Bar” you can filter for the following metadata entries:
- Artist
- Title
- Object ID/Inventory number (ID)
- Dating
- Medium
- Comment
All data fields can be activated and searched simultaneously.
Imported files can also be filtered using the following format criteria:
- All
- 2D
- 3D
- Pseudo-3D
- Video
- Text
Note:
If you would like to export a clear list of your exhibits including metadata for distribution, you can use the XLS file format. The export is done via the menu File / Export / Exhibit list.
Tools
Secondary menu

The right-click menu, or secondary menu, combines the most important project-related operations into one compact menu.
Color wall
Right-click on a wall, floor or ceiling and select the ![]() icon. The “Colorize Wall” dialog opens, where you can colorize the selected element.
icon. The “Colorize Wall” dialog opens, where you can colorize the selected element.
Wall dimensioning
This tool works only on walls and temporary architecture. First place at least one exhibit on a wall and then right-click on that wall. Now select the ![]() icon to display the dimensions.
icon to display the dimensions.
Wall development as PDF
To get a PDF document with all dimensions, right-click on the desired wall and select the ![]() icon.
icon.
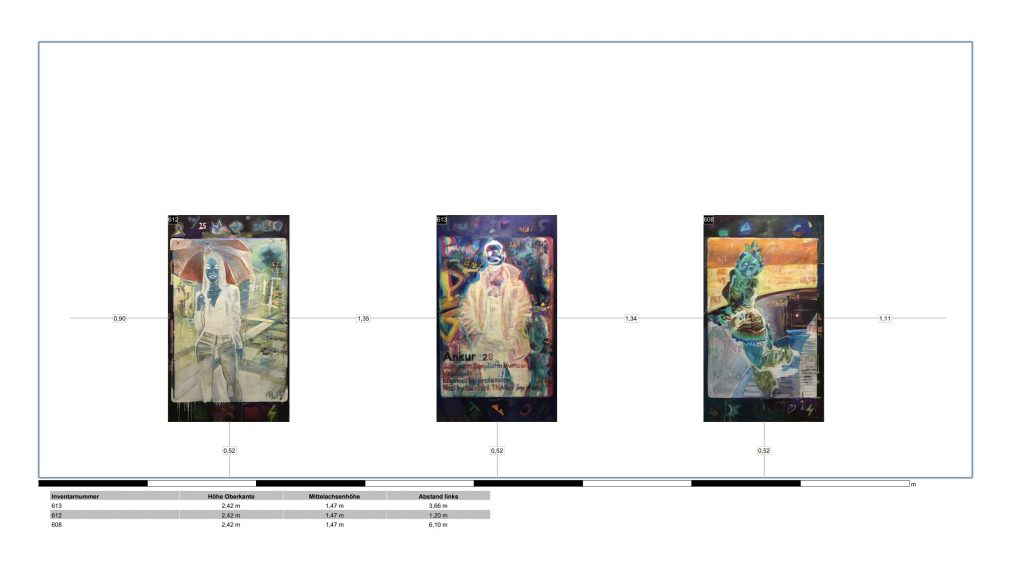
Note:
At least one exhibit should be placed on the wall to create a sensible wall layout.
Screenshot erstellen
A screenshot in double window resolution of the respective working perspective can also be created via the right-click menu. First align your view in the 3D, or model view and then right click on the floor, wall or ceiling and select the ![]() icon. After that, your file manager will open and you can determine where to save your recording.
icon. After that, your file manager will open and you can determine where to save your recording.
InteractiveTour VR erstellen
Under this menu item ![]() you can create virtual tours of your exhibitions. For this you need the InteractiveTour VR plugin, more about this in the corresponding section.
you can create virtual tours of your exhibitions. For this you need the InteractiveTour VR plugin, more about this in the corresponding section.
Exponate automatisch platzieren
Select the ![]() icon from the right-click menu and automatically pre-place exhibits on a wall. Before placing, you have the option to set the minimum distance between the individual exhibits. This function is particularly effective when used in conjunction with filtering. Search your exhibits for e.g. an artist and place the respective exhibits on the desired wall.
icon from the right-click menu and automatically pre-place exhibits on a wall. Before placing, you have the option to set the minimum distance between the individual exhibits. This function is particularly effective when used in conjunction with filtering. Search your exhibits for e.g. an artist and place the respective exhibits on the desired wall.
Tools
Wallpapers / Background graphic
Import an image file or use an exhibit that has already been imported.
Search for the corresponding image in the “Gallery bar” and double-click on the image with the left mouse button to change the dimensions of the image. Enter the appropriate height and width under the “Exhibit” tab and confirm the settings with the “Apply” button at the bottom right of the window. After you have adjusted the settings, you can drag the picture from the “gallery bar” onto the desired wall.
Now carry out the positioning and finally click on the “Create wallpaper” button in the “Quick positioning tool”.
To change a wallpaper back, click with the right mouse button on the corresponding wall and select the wall colouring symbol ![]() in the “Secondary menu”. After the wall colouring window has opened, all you have to do is click on the “Remove wallpaper” button, whereby the wallpaper is converted back into a normal image and placed back in the “Gallery bar”.
in the “Secondary menu”. After the wall colouring window has opened, all you have to do is click on the “Remove wallpaper” button, whereby the wallpaper is converted back into a normal image and placed back in the “Gallery bar”.
Tools
Create text
cura3D museum pro makes it possible to create texts using an internal text editor. The texts can also be edited at any time after placement in the exhibition rooms by double-clicking on the text.
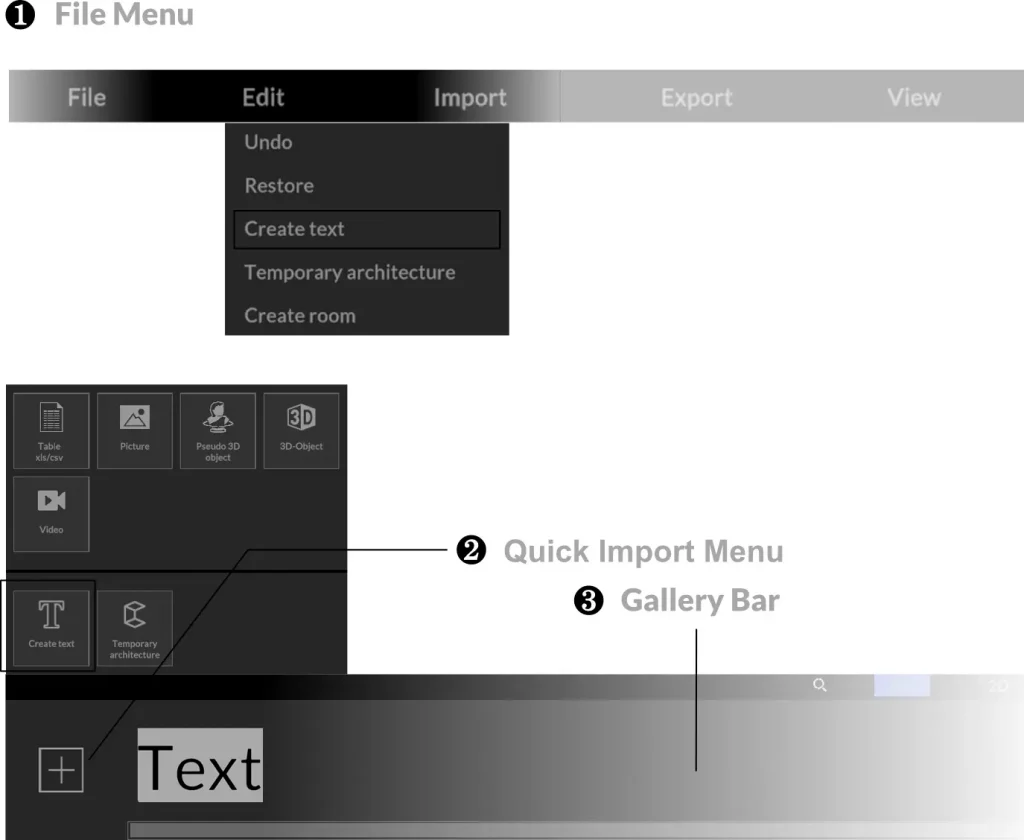
You can find the text editor in the “File menu” ❶ or in the “Quick import menu” ❷ at the bottom left of the “Gallery bar” ❸.
Just like exhibits, the created text elements are initially located in the “Gallery bar” ❸ and must first be dragged and dropped onto the walls. Once the created text element has been placed on the wall from the gallery bar, you can start editing by double-clicking on the text.
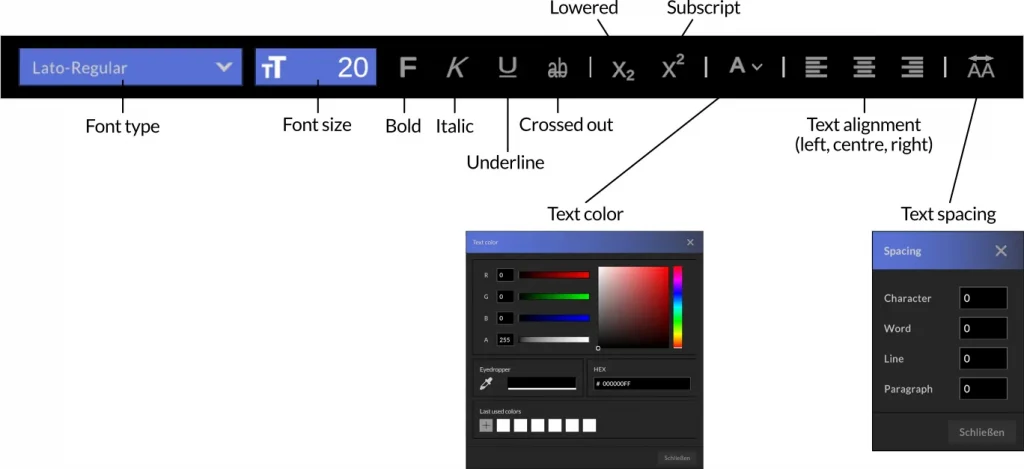
Move texts by holding down the mouse button and adjust the text box format with the blue frame. The editing of the text corresponds to that of standard word processing programs, select individual letters or entire words to adjust font styles.
For typographically complex texts, please use common editors such as Adobe Indesign® or Affnity Publisher®. and export it in PNG format with layer transparency. The imported texts behave like images that can be scaled.
This function is ideal for incorporating texts already set by Gestaler:Innen into the visualization.
Tools
Temporary architecture
With the temporary architecture, you can create pedestals, platforms, pillars and free-standing walls that you can later hang exhibits on, add texts to and colour. To create temporary architecture, use the “File Menu” or the “Quick Import Menu” again and select the appropriate menu item.
In the opened editor you will see the floor plan of the building, now navigate to the desired room with the third mouse button pressed (scroll wheel) and double-click at the desired location where, for example, a base is to be created. Then edit the dimensions of your temporary architecture.
Hold down the left mouse button to reposition the pedestal in space, use the distance grid to move the object only at certain distances.
To delete temporary architecture, right-click on the corresponding architecture element. Note that there must no longer be any exhibits on the wall / plinth to be deleted.
Projects
Exporting and importing
Export project
Exporting a project has the advantage of permanently archiving your project externally and also making it available to other team members.
To export a project, select “File / Export project” in the file menu and assign a new name for your project file.
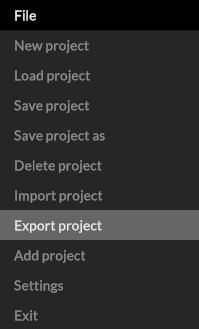
This file (*.c3darch file) not only stores all exhibits, whether 2D or 3D data and temporary architecture, but also the placement of objects on walls and floors as well as the wall coloring.
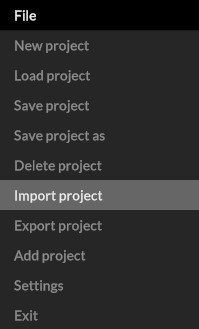
Import project
To import a project, select “File / Import project” in the file menu and then select the *.c3darch archive file in your file explorer. Depending on the size of the project and the computing power of your computer, the import may take a little while, as all the contents have to be unpacked and loaded into your architecture.
Projects
Save and load project
Save project
To save a project, select “File / Save project as” in the file menu and assign a new name for your project.
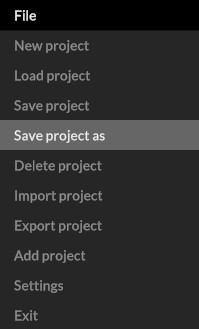
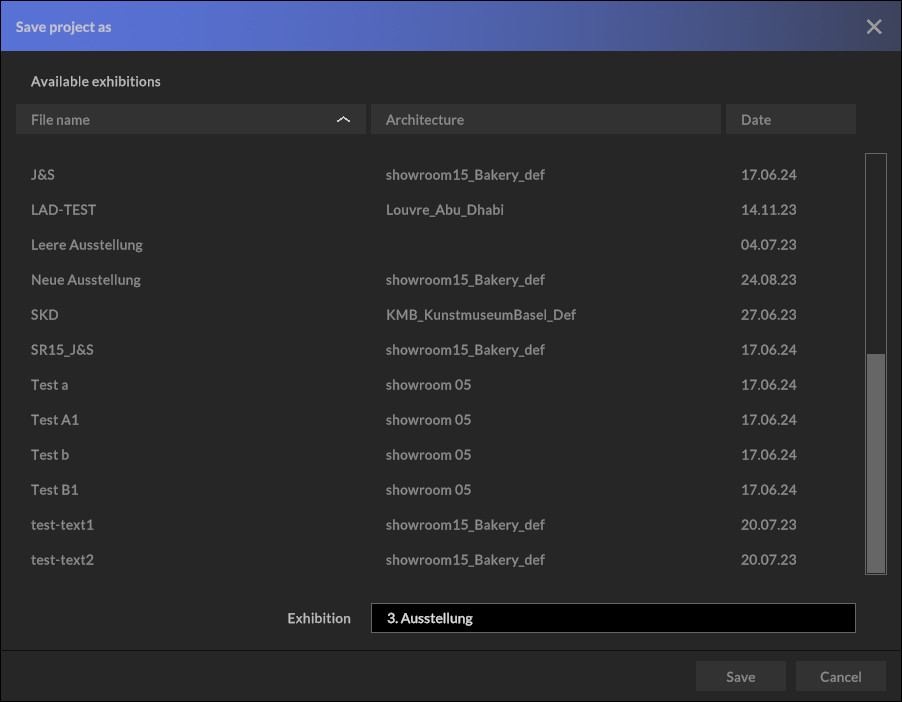
Alternatively, you can also overwrite an existing project by selecting it from the top list and confirming with “Save”.
To save future changes in your current project, simply select “File / Save”.
Load project
To load a saved project, go to “File / Load project” via the file menu.
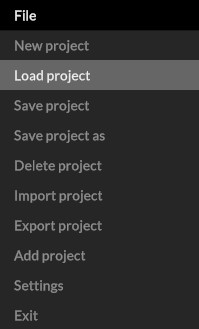
Attention: You will be asked whether you want to save your current project. Make the appropriate selection here to access the project manager, where you can view and select your saved projects in the top list.
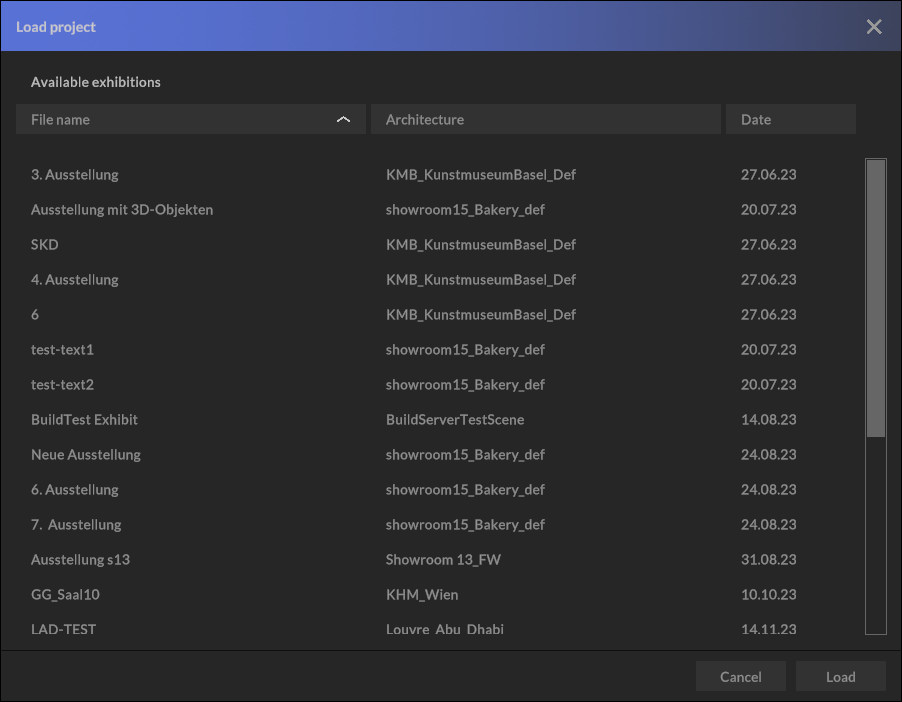
Click on “Load” to confirm your selection and the project will be loaded.
Projects
Merging projects
The “Add project” menu item is a powerful tool for working on a project with several curators. For example, divide up the rooms, artists and exhibits and then bring your work together.
1) Import your exhibits and move into the room to begin placement.
2) Design your rooms and place the exhibits in the room.
3) Save your exhibition by clicking on “File / Save project”. Proceed in the same way with the remaining rooms and exhibits.
4) Open the main project and add all other designed showrooms using “File / Add project”.
Note:
If you are working on separate computers, first export your project via: ” File / Export project” and send the created archive file to a team member.
This archive file must first be loaded via: ” File / Import project” and then saved locally via: “File / Save project as”.
The main project file is then opened and the missing exhibits are added by simply adding the desired project via: ” File / Add project”.
Plugins
InteractiveTour VR
With our InteractiveTour VR plugin for museum pro and gallery pro,
you can easily publish your exhibition as a virtual tour with any number of viewpoints.
Once the tour has been published, an embedding link is automatically created, enabling you to embed your virtual tour of your exhibition in all common content management systems, such as WordPress, Joomla, Drupal, etc.
To create a tour, click on the icon in the toolbar, use the secondary menu or select Export -> 360 degree tour.
The administration interface for virtual tours then opens. Go to the desired starting point of your tour and click on “Add point of view”. Move through the exhibition in the desired sequence of your tour and add further viewpoints. The viewpoints can also be added in the floor plan view. The order of the viewpoints can also be changed afterwards using the arrows. The locations can also be named via the text input field. By editing the X and Y coordinates (same values), you can fine-tune viewpoints and ensure that they are precisely on one axis.
Individual viewpoints can be deleted via ![]() . Finally, go to the 3D view and click on the button “Publish tour”, select the desired resolution (recommendation: 8192 x 4096 pixels for work stands, 16192 x 8192 pixels for publications). The processing and rendering of the virtual tour now begins and can take some time (depending on the size of the tour / number of viewpoints, 10 viewpoints in high resolution take approx. 2 -5 minutes). Then choose a unique name for your tour.
. Finally, go to the 3D view and click on the button “Publish tour”, select the desired resolution (recommendation: 8192 x 4096 pixels for work stands, 16192 x 8192 pixels for publications). The processing and rendering of the virtual tour now begins and can take some time (depending on the size of the tour / number of viewpoints, 10 viewpoints in high resolution take approx. 2 -5 minutes). Then choose a unique name for your tour.
After a successful upload, your browser opens and you can walk through your virtual exhibition web-based. In museum pro / gallery pro, the embedding link is displayed and offered for copying to the clipboard.
The metadata previously imported in our planning software is adopted and can be displayed by clicking on the exhibit.
Further entries can be added in the admin area of the virtual tour
Each front-end area (index.html) has a corresponding back-end area, which can be accessed via indexAdmin.html.
Attention:
Tours with the same name are overwritten without prompting. So make sure to assign unique tour names, for example by prefixing them with a date stamp. (230804_TourXY)